TL;DR:
- Proper surface preparation is essential, as inadequate cleaning and feathering lead to recurring rust and failed repairs.
- Mechanical abrasion and chemical treatments must be combined with thorough cleaning, degreasing, and patience to ensure long-lasting results.
- Severe rust damage or structural issues require professional equipment and expertise to effectively restore and protect the metal.
Rust doesn’t wait. It spreads from a small orange spot into a structural problem faster than most people expect, and the frustration of watching your tools, railings, or equipment deteriorate is real. The good news is that a methodical step by step rust removal process works on most common metal surfaces, and you don’t need professional equipment to get results that actually last. This guide walks you through everything from gathering supplies to sealing the job with a protective coat, with specific product recommendations, safety reminders, and the technique details that separate a lasting repair from one that rusts again in six months.
Table of Contents
- Key takeaways
- What you need before starting step by step rust removal
- The mechanical rust removal process, step by step
- Chemical rust removal methods and how to apply them
- Painting and finishing after rust removal
- Troubleshooting and when to stop the DIY approach
- What I’ve learned about rust removal after watching too many failed repairs
- When your rust problem needs a professional solution
- FAQ
Key takeaways
| Point | Details |
|---|---|
| Prep before everything | Clean, degrease, and tape off the work area before touching any abrasive or chemical. |
| Match method to rust severity | Use mechanical abrasives for surface rust and chemical soaks or converters for deep pitting. |
| Feather your edges | Blending abraded areas into surrounding paint prevents sharp edges where rust can return. |
| Prime without delay | Apply rust-inhibiting primer within hours of bare metal exposure to stop flash rust. |
| Know your limits | Severe structural rust or large surface areas call for professional sandblasting, not DIY methods. |
What you need before starting step by step rust removal
Getting the right supplies together before you start saves you from stopping mid-job with bare metal exposed. Here is what you actually need.
Mechanical tools and abrasives
- Coarse sandpaper (40 to 80 grit): For stripping heavy rust and loose paint
- Medium sandpaper (120 to 180 grit): For smoothing after coarse work
- Fine sandpaper (220 to 320 grit): For feathering edges and final surface prep
- Wire brush and wire wheel: For scrubbing pitted surfaces and corners
- Sanding block: Keeps pressure even on flat surfaces
- Angle grinder (optional): For large rust patches on thick metal
Fine sandpaper and wire brushes are the standard tools for light to moderate rust, and they are available at any hardware store.
Chemical products
| Product | Best Use | Notes |
|---|---|---|
| Evapo-Rust | Deep soak for small parts | Non-toxic, acid-free soak for full immersion |
| Corroseal Rust Converter | Stabilizing active rust in place | Covers 50 sq ft per quart, cures overnight |
| Phosphoric acid (20%) | Heavy rust conversion on large flat areas | Use neat for heavy rust, diluted 1:1 for light rust |
| Baking soda paste | Light rust on stainless steel | 1 tbsp baking soda plus water, applied 15 to 20 minutes |
| Degreaser or wax remover | Surface cleaning before any treatment | Required before every method |
Personal protective equipment
Never skip PPE. That means chemical-resistant gloves, safety glasses or a face shield, and a dust mask rated for fine metal particles at minimum. When using phosphoric acid or rust converter, add a respirator rated for chemical vapors.
Pro Tip: Set up your workspace outdoors or in a well-ventilated area. Chemical rust removers release fumes that build up fast in enclosed spaces.
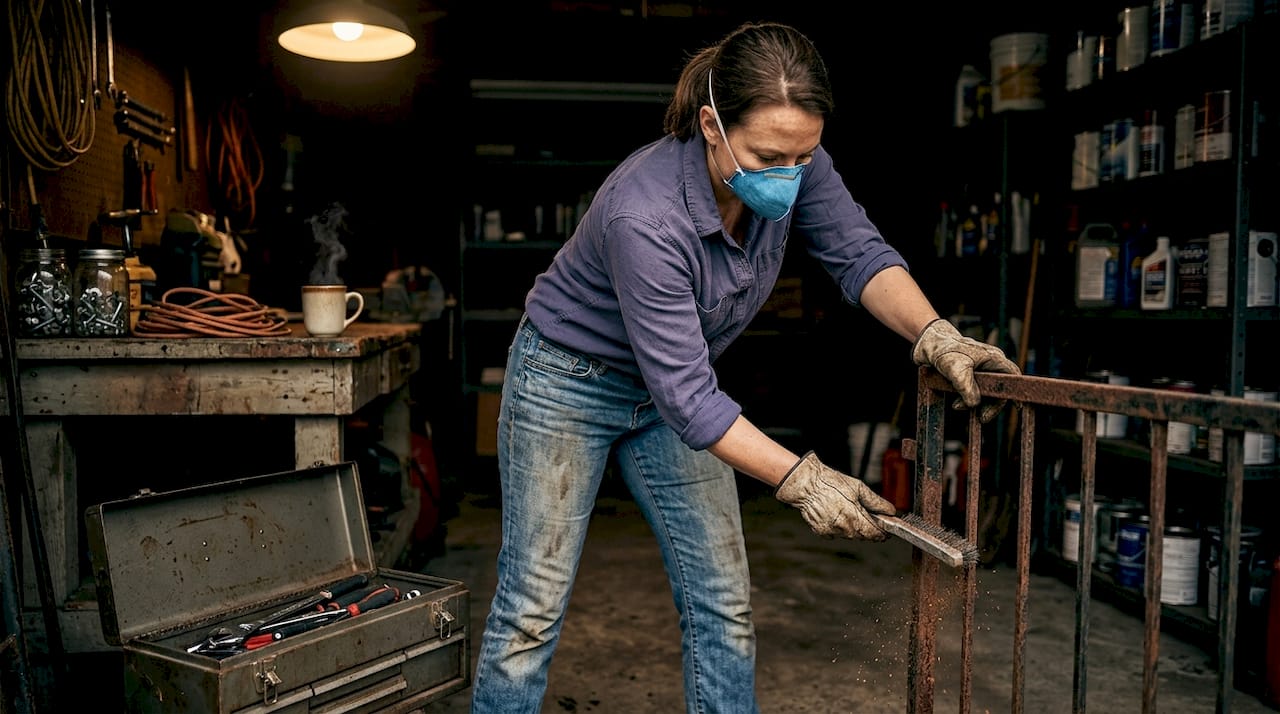
The mechanical rust removal process, step by step
Proper surface prep is the deciding factor between a repair that holds for years and one that fails before the season changes. Follow these steps in order.
-
Tape off surrounding areas. Use painter’s tape and plastic sheeting to protect paint, glass, and trim near your work area. This keeps dust and chemical overspray from creating new problems.
-
Degrease the surface. Wipe down the entire area with a wax remover or degreaser. Chemical rust removal cannot effectively penetrate greasy or flaking surfaces, and mechanical work on a dirty surface just drives contamination deeper.
-
Remove loose rust with a wire brush. Scrub vigorously to knock off any flaking scale or blistered paint. You want to be working on firmly attached rust, not loose debris.
-
Sand with coarse grit first. Use 40 to 80 grit sandpaper to cut through rust down to bare metal. Coarse abrasives remove bulk rust efficiently but leave deep scratch marks that need to be refined. Work in consistent strokes and don’t skip areas.
-
Step up through finer grits. Move from 80 to 120, then to 180 grit. Coarse abrasives create surface profiles that telegraph through primer and paint if you don’t refine them. Take this step seriously.
-
Inspect for pits and crevices. Pitted metal hides rust that flat sanding misses. Use a pick or small wire brush to clean out individual pits. If the pitting is deep, a rust converter applied into the pits before priming is a smart move.
-
Feather the edges. This is the step most DIYers skip, and it’s why their repairs look patchy and re-rust at the border. Feathering edges after rust removal blends the repair into the surrounding paint and eliminates sharp transitions where moisture collects.
-
Final wipe-down. Use a clean cloth dampened with degreaser to remove all sanding dust before any chemical treatment or primer goes on.
Pro Tip: Work in small sections if the rusted area is large. Exposing too much bare metal at once increases your risk of flash rust forming before you can prime.
A few safety notes. Wear your mask while sanding. Metal dust is not just dirty; it is harmful. Keep your angle grinder disc guard in place and never grind toward your body.
Chemical rust removal methods and how to apply them
Mechanical abrasion gets the bulk work done, but chemical methods either complement or replace it depending on your situation. Soaking works well for small removable parts. Converters work on rust you cannot sand out fully. Acid treatments handle heavy scale on structural metal.
Soak method with Evapo-Rust
- Remove the rusted part from the larger structure if possible.
- Submerge it completely in Evapo-Rust solution in a plastic container.
- Let it soak for one to several hours depending on rust severity. Check every 30 minutes.
- Remove the part, rinse thoroughly with water, and dry immediately.
- Prime within one hour of rinsing to prevent flash rust.
Rust converter application
| Step | Action | Notes |
|---|---|---|
| 1 | Remove all loose rust mechanically | Residues prevent primer adhesion and cause paint failure |
| 2 | Clean and degrease thoroughly | Surface must be dry and free of oils |
| 3 | Apply converter by brush or roller | Work it into pits and edges |
| 4 | Allow full cure | Corroseal requires overnight cure before priming |
| 5 | Apply primer directly over converter | No sanding needed if surface is smooth |
Phosphoric acid treatment
Apply phosphoric acid with a brush and allow it to react for 10 to 20 minutes. You will see the surface shift from orange rust to a dark gray or black iron phosphate layer. Rinse thoroughly with water, neutralize with a baking soda solution if needed, and allow to dry completely before priming.
Pro Tip: Never apply rust converter or phosphoric acid over paint, oil, or mill scale. The chemical reaction only works when it contacts actual iron oxide. Mechanical prep is always the first step.
Painting and finishing after rust removal

Getting to bare metal is only half the job. How you seal and protect that metal determines whether your work lasts one season or one decade.
Start with a rust-inhibiting primer. Self-etching primer bonds directly to bare metal and creates a surface that topcoats grip. Do not substitute regular primer here. The chemistry matters.
- Apply the first coat thin. Thick primer coats sag, trap air, and take forever to cure. Two thin coats outperform one heavy coat every time.
- Allow each coat to dry fully before adding the next. Check the product label, but most primers need at least 30 to 60 minutes between coats in normal humidity. Florida summers with high humidity will push that to 90 minutes.
- Drying properly after metal treatment directly reduces rust recurrence. Moisture denial is your most effective long-term strategy.
- Blend paint edges carefully into the surrounding surface. Use 400 grit wet sandpaper between primer and topcoat to get a smooth transition.
- Apply topcoat paint in thin, even layers. Two to three coats is standard. Color-match your topcoat as closely as possible to surrounding paint for a finish that is hard to spot.
Avoid these common finishing mistakes. Skipping primer and going straight to topcoat. Painting over rust that wasn’t fully converted. Applying paint in direct sunlight where it flashes dry too fast and doesn’t cure properly.
Troubleshooting and when to stop the DIY approach
Even careful work runs into problems. Here is how to handle the most common ones.
- Missed rust spots: If you find orange spots after priming, sand back to bare metal, treat, and re-prime. Do not paint over them hoping for the best.
- Flash rust forming fast: This usually means bare metal sat too long before priming or the surface wasn’t fully dry. Work faster between steps or use a rust converter as an intermediate layer.
- Paint peeling after repair: Often caused by residue left on the surface before priming. Strip back to metal, degrease thoroughly, and start again.
Pro Tip: If bare metal develops rust within minutes of being exposed to air, your environment is extremely humid. Work indoors, use a dehumidifier, or apply rust converter immediately after sanding to buy yourself more time.
Rust damage that has eaten through metal, compromised structural integrity, or spread across more than a few square feet is beyond what sandpaper and a rattle can will solve. At that point, calling a professional isn’t admitting defeat. It’s making the smarter decision about your time and money.
Signs you need professional help: metal that flexes or crumbles under pressure, rust spread under paint across large areas, structural components like beams or railings that feel unstable.
What I’ve learned about rust removal after watching too many failed repairs
I’ve seen the same mistake repeated more times than I can count. Someone spends 20 minutes sanding, sprays primer right away, and calls it done. Six months later the rust is back, usually worse, because the prep was rushed and the edges weren’t feathered.
The honest truth is that mechanical surface preparation is the most time-consuming part of this job, and it’s also the part that determines everything that follows. You can use the best rust converter on the market, but if there’s grease or loose scale underneath it, it won’t bond properly. The product doesn’t fail. The prep failed.
What I’ve found is that DIYers tend to underestimate how thorough “clean” needs to be before chemical treatment. Metal that looks clean after a quick wipe still has oils from handling that will prevent primer adhesion. A degreaser isn’t optional. It’s the step that makes every other step work.
My take on speed versus quality: if you’re in a hurry, do a smaller area properly rather than a larger area poorly. Rust repair rewards patience. The rust removal methods that hold up over time are almost always the ones where someone took an extra 30 minutes on prep that they didn’t think they needed.
— Southernsandblastingandpainting
When your rust problem needs a professional solution
For surface rust on a garden gate or a tool shelf, the steps in this guide will handle it. But some jobs go beyond what DIY methods can reach effectively.
Southernsandblastingandpainting has spent more than 20 years handling rust removal and protective coatings on infrastructure that can’t afford to fail. Water tanks, pipelines, city structures, and industrial equipment. The same principles behind this guide apply at that scale, but the execution requires equipment and industrial-grade coatings that extend metal life by decades rather than seasons. If you’re managing a facility, maintaining municipal assets, or dealing with rust on a structure where failure has real consequences, professional sandblasting strips rust to bare metal faster, more thoroughly, and more evenly than any hand tool. Explore the sandblasting services in Orlando that Southernsandblastingandpainting offers, or review the sandblasting equipment guide to understand what professional-grade rust removal actually looks like compared to the DIY process.
FAQ
What is the first step in removing rust from metal?
Clean and degrease the surface before any sanding or chemical treatment. Rust removal chemicals and abrasives both perform better on a surface free of oil, dirt, and loose scale.
How long does rust converter take to cure?
Most rust converters, including Corroseal, require overnight curing before you can apply primer. Check the product label, since curing times vary by brand and humidity level.
Can I paint directly over rust after using a converter?
No. A rust converter primes in one coat on its own, but you still need to apply a topcoat for full protection. Applying topcoat directly without primer over bare metal areas will result in early peeling.
What causes flash rust after sanding?
Flash rust forms when bare metal is exposed to moisture before being primed. It happens fastest in humid conditions. Apply primer or a rust converter within one to two hours of bare metal exposure to prevent it.
When should I stop DIY rust removal and call a professional?
Stop the DIY approach when rust has penetrated through the metal, compromised structural integrity, or spread across a surface area too large for hand tools to cover evenly. Those situations call for professional sandblasting and industrial coatings.


