

Meet safety standards by building a proactive safety-and-health program around OSHA’s seven core elements, applying the hierarchy of controls to every hazard you find, and verifying results through regular audits, inspections, and worker feedback. That’s the whole model in one sentence. Everything else in this guide is the how.
Most employers already know they need to comply with OSHA. Fewer know that OSHA itself does not run on a rigid rulebook so much as a repeatable process: find hazards before they hurt someone, fix them in the right order, train people, check your work, and do it again. Skip the process and chase citations instead, and you’ll spend more time reacting to incidents than preventing them.
Here’s what to do this week, not eventually:
- Assign one person clear ownership of safety leadership, even if it’s not their full-time job yet.
- Start a hazard inventory: walk the floor, talk to workers, pull your injury logs.
- Schedule your first round of task-specific training within 30 days.
- Open a recordkeeping system now, before you need it for an OSHA 300 log entry.
- Identify who on your team will handle incident investigations before an incident happens.
- Assign leadership and a budget line for safety.
- Build your hazard inventory using inspections, job safety analyses, and injury records.
- Prioritize fixes with the hierarchy of controls, starting with elimination or engineering.
- Train workers in their own language, on the specific hazards of their job.
- Audit the program at least annually and after any major change.
Pro Tip: Don’t wait for a perfect program before you start. OSHA’s step-by-step guide and self-evaluation checklist are built for employers who are starting from zero. Use them as scaffolding rather than trying to write your program from scratch.
Key Takeaways
Meeting safety standards requires a proactive program built on OSHA’s seven core elements, controls chosen through the hierarchy of controls, and verification through regular audits and worker input.
| Point | Details |
|---|---|
| Build on seven core elements | Structure your program around leadership, participation, hazard ID, controls, training, evaluation, and multiemployer coordination. |
| Prioritize engineering over PPE | Fix hazards at the source with elimination or engineering controls before relying on protective equipment. |
| Involve workers directly | Recruit representatives, document their input, and remove barriers to hazard reporting without retaliation. |
| Audit at least annually | Verify the program initially, then evaluate performance yearly and after any major workplace change. |
| Meet reporting deadlines | Report fatalities within 8 hours and hospitalizations within 24 hours to avoid separate penalties. |
30-day priorities: Assign a safety lead, complete a baseline hazard walkthrough, and open your recordkeeping system.
90-day priorities: Recruit worker representatives, complete JSAs on your highest-priority tasks, and begin task-specific training.
365-day priorities: Complete a full program audit, close out outstanding corrective actions, and formalize multiemployer coordination procedures if subcontractors work your sites.
- Start with hazard identification, not paperwork, since you can’t control what you haven’t found.
- Choose controls from the top of the hierarchy down, engineering before PPE, whenever budget allows.
- Document worker participation as evidence your program is functioning, not just written.
- Use OSHA’s On-Site Consultation program if you’re unsure where your gaps are; it’s free and confidential.
If you’re planning a surface preparation or industrial coatings project and want a contractor who builds hazard controls into the job from day one, Southernsandblastingandpainting’s services page outlines how that work gets done on active commercial and municipal sites.
Table of Contents
- How Do You Meet Safety Standards Using OSHA’s Seven Core Elements?
- How Do You Identify and Assess Workplace Hazards?
- Which Controls Actually Prevent Injuries?
- What Should Safety Training Actually Cover?
- How Often Should You Audit Your Safety Program?
- What Are Your Core OSHA Compliance Responsibilities?
- What Mistakes Keep Employers Out of Compliance?
- What Templates Do You Need to Get Started?
- Why Prevention and Engineering Controls Matter on Every Job
- Where Can You Find Official Safety Standards Resources?
- Sources
How Do You Meet Safety Standards Using OSHA’s Seven Core Elements?
OSHA’s recommended approach isn’t a single regulation you check off. It’s a management system built on seven core elements: management leadership, worker participation, hazard identification and assessment, hazard prevention and control, education and training, program evaluation and improvement, and coordination for multiemployer worksites. Employers who treat these as one connected system, rather than seven separate boxes, get measurably better outcomes because each element feeds the next.
Management leadership means visible commitment, not a laminated poster in the break room. Leadership sets the safety policy, allocates the budget, and holds supervisors accountable for hazard correction, not just production numbers.
Worker participation means workers help identify hazards and shape controls, because they see conditions supervisors often miss. Worker input improves control selection, training relevance, and the quality of incident investigations.
Hazard identification and assessment is the ongoing detective work: inspections, job safety analyses, incident reviews, and reviewing Safety Data Sheets. Hazard prevention and control applies the hierarchy of controls to whatever you find. Education and training makes sure every worker understands the hazards of their specific task and what to do about them. Program evaluation and improvement closes the loop by checking whether any of this actually worked. Coordination for multiemployer worksites matters anywhere subcontractors, temp staff, or multiple companies share a job site, since hazard information has to travel between employers, not just within one.
Here’s a practical rollout:
- Days 1 to 30: Name a safety lead, draft a policy statement, and complete a baseline hazard walkthrough of every work area to identify hazards.
- Days 31 to 90: Recruit worker representatives, run your first round of job safety analyses on high-risk tasks, and start formal training on the hazards identified.
- Days 91 to 365: Complete your first full program audit, close out corrective actions, and formalize coordination procedures if you use subcontractors.
Assign a name, not just a role, to each element.
Pro Tip: When you’re short on time and budget, prioritize hazard prevention and control first. Fixing the three hazards most likely to cause serious injury this month protects people faster than perfecting your paperwork. OSHA’s self-evaluation checklist helps you find those gaps quickly.
How Do You Identify and Assess Workplace Hazards?
Hazard identification has to be a continuous habit, not an annual event you schedule around an inspector’s visit. OSHA’s guidance frames this as an ongoing process: collect hazard information, inspect the workplace regularly, investigate every incident and near miss, and prioritize what you find so you fix the worst risks first.
Workplace inspections work best when they’re not a solo exercise. Bring a worker from the area you’re inspecting. They know which guard gets removed during a rush job and which ventilation fan has been “temporarily” broken for six months. Walk the same route every time so nothing gets skipped, and document findings the same day while details are fresh.

A Job Safety Analysis (JSA), sometimes called a Job Hazard Analysis (JHA), breaks a task into its individual steps and asks what could go wrong at each one. OSHA’s JSA training manual recommends building this directly into written procedures and training materials rather than filing it away after the fact. A simple JSA for confined-space entry might look like this:
| Job step | Potential hazard | Recommended control |
|---|---|---|
| Opening the entry hatch | Sudden release of trapped gas | Test atmosphere before opening; ventilate |
| Descending into the space | Fall, oxygen deficiency | Retrieval harness; continuous air monitoring |
| Performing the work task | Toxic exposure, entrapment | Attendant stationed outside; rescue plan in place |
Ask these questions for every task you analyze: What could go wrong at this step? How severe would the injury be? How likely is it to happen? What’s already in place to prevent it? What else should be?
Records tell you what your eyes miss. Your OSHA 300 log shows patterns across time, whether that’s a recurring strain injury on one production line or a cluster of slips near a specific doorway. Safety Data Sheets and equipment manuals flag chemical and mechanical hazards that aren’t obvious from a visual walkthrough. Cross-reference all three: inspections, JSAs, and records rarely tell the identical story, and the gaps between them are usually where your biggest blind spots live.
Once you’ve identified hazards, rank them. A simple severity by likelihood matrix works for most workplaces:
| Hazard | Severity | Likelihood | Priority |
|---|---|---|---|
| Unguarded blast nozzle | High | Medium | Fix immediately |
| Cluttered walkway near loading dock | Medium | High | Fix this week |
| Faded warning sign on chemical storage | Low | Low | Schedule replacement |
Pro Tip: A sandblasting or industrial coatings project generates hazards that shift daily as the job progresses. Re-run a short JSA at the start of each new phase instead of relying on the one you wrote at kickoff. Southernsandblastingandpainting builds this kind of phase-by-phase hazard review into its own industrial safety practices for surface prep projects.
Which Controls Actually Prevent Injuries?
The hierarchy of controls ranks solutions by reliability, not convenience: eliminate the hazard, substitute something safer, engineer it out, add administrative controls, and use PPE last. Employers who reverse this order, reaching for gloves and respirators before asking whether the hazard can be removed entirely, end up defending a weaker line of protection while paying ongoing costs for equipment, fit-testing, and replacement gear.
Roughly speaking, risk equals hazard multiplied by exposure. Reducing either one lowers risk, and the most durable way to do that is elimination or engineering, not asking a worker to remember to wear something correctly, every shift, for years.
Applied to real tasks, the hierarchy looks like this:
- Elimination or substitution: Replace a solvent-based coating with a low-VOC alternative that removes the inhalation hazard rather than managing it.
- Engineering controls: Install local exhaust ventilation at a grinding station instead of relying solely on respirators.
- Enclosure: Contain an abrasive blasting operation inside a blast room to keep dust and debris away from bystanders.
- Administrative controls: Rotate workers through high-exposure tasks to limit individual exposure time.
- PPE: Respirators, hearing protection, and blast suits as the last layer, not the only layer.
Verify controls with a short checklist:
- Does the control actually reduce the hazard, or just relocate it?
- Can workers bypass the control easily under time pressure?
- Does the new control introduce a different hazard (a guard that blocks visibility, a ventilation system that creates noise exposure)?
- Has a worker who performs the task confirmed it works in practice, not just on paper?
Statistic Callout: OSHA ranks controls in this exact order because engineering and elimination measures remove the hazard from the environment permanently, while PPE only creates a barrier that depends on correct use every single time. That’s the core reason PPE sits at the bottom of the hierarchy rather than the top.
A ventilation system that eliminates a dust hazard can still create a new one if it isn’t sized correctly. Partner resources like this guide to dust prevention in industrial facilities walk through containment strategies that avoid trading one exposure problem for another.
What Should Safety Training Actually Cover?
Training fails most often when it’s generic. A once-a-year video on general workplace safety doesn’t tell a coatings applicator what to do about isocyanate exposure, and it doesn’t tell a forklift operator what changed in the warehouse layout last month. Effective training is task-specific and tied directly to the hazards identified in your JSAs.
Cover these topics at minimum:
- Task-specific hazards and controls drawn straight from your JSA.
- Correct PPE selection, fit, and limitations for the job at hand.
- Emergency procedures specific to the work area, not a generic building evacuation plan.
- How and where to report hazards, including near misses, without fear of retaliation.
- How to read a Safety Data Sheet for the chemicals used on that specific task.
A workable training plan sets a cadence, not a one-time event:
- New hire orientation: General safety policy plus task-specific JSA training before unsupervised work begins.
- Quarterly refreshers: Focused fifteen-minute sessions tied to recent incidents or near misses.
- Annual full review: Complete retraining on all task-specific hazards, updated for any process changes.
- Post-incident training: Immediate retraining for anyone involved in or near an incident.
Track completion rate, not just attendance. A worker who sat through a session but can’t describe the hazard afterward hasn’t actually been trained.
Worker participation needs the same intentional structure as training. Recruit representatives from each shift and department, not just the same three volunteers every time. Remove real barriers: hold safety meetings during paid time, not after a shift when people want to go home, and make hazard reporting possible without going through a supervisor who might discourage it. Document every piece of worker input you act on. That record becomes evidence your program is genuinely participatory, not participatory on paper only.
Deliver training in the language and literacy level your workforce actually uses. Federal guidance is explicit that training must be understandable, not just translated word for word. A safety data sheet summary written at a tenth-grade reading level in English does nothing for a crew that reads at a different level or speaks a different language day to day.
Pro Tip: Ask workers to explain a hazard back to you in their own words at the end of training. If they can’t, the training didn’t work, regardless of how good the slide deck looked.
How Often Should You Audit Your Safety Program?
A safety program you never check is a policy document, not a program. OSHA’s guidance calls for verifying implementation initially, then evaluating performance at least annually, and again after any significant change like new equipment, a new process, or a facility expansion.
Build your audit around the seven core elements directly. Ask whether leadership commitment is visible and funded, whether worker participation is documented and acted on, whether your hazard inventory is current, whether controls match the hierarchy, whether training completion rates are where they should be, and whether coordination with subcontractors on shared worksites is actually happening.
When an incident does occur, resist the urge to stop at “worker error.” Root cause analysis means asking why, repeatedly, until you reach a systemic answer. A worker who removed a machine guard didn’t do it out of carelessness; find out why the guard slowed production enough that removing it seemed necessary, and you’ve found the real problem.
A basic incident investigation should include: securing the scene and gathering immediate facts, interviewing witnesses separately, mapping the sequence of events, identifying every contributing factor rather than a single cause, and assigning corrective actions with a deadline and an owner.
Track a small set of KPIs rather than a dashboard nobody reads:
| KPI | What it tells you |
|---|---|
| Inspection completion rate | Whether scheduled inspections are actually happening on time |
| Corrective action closeout time | How fast identified hazards get fixed, not just logged |
| Near-miss reporting rate | Whether workers feel safe reporting problems before someone gets hurt |
A rising near-miss reporting rate is usually a good sign, not a bad one. It means people trust the system enough to speak up before an injury forces the conversation.
Pro Tip: If your near-miss reports have been flat for months, that’s rarely because nothing is going wrong. It’s more often a sign the reporting process is too slow, too public, or too punitive, and people have quietly stopped using it.
What Are Your Core OSHA Compliance Responsibilities?
Beyond building a program, employers carry specific legal obligations that don’t flex based on company size or industry. Employer responsibilities include:
- Providing required PPE at no cost to the worker.
- Delivering safety training in a language and vocabulary workers understand.
- Keeping an OSHA 300 log where your industry and company size require it.
- Reporting a workplace fatality within 8 hours and any hospitalization, amputation, or loss of an eye within 24 hours.
- Posting the required OSHA poster and any citations in a visible location.
- Examining workplace conditions to confirm they meet applicable OSHA standards, and maintaining tools and equipment in safe working order.
Statistic Callout: The 8-hour and 24-hour reporting windows are not guidelines, they’re firm legal deadlines. Missing them can trigger penalties separate from any citation related to the underlying incident itself.
If you’re not sure where your program has gaps, OSHA’s On-Site Consultation program offers free, confidential help that doesn’t result in citations, a genuinely underused resource for small and mid-sized employers who assume asking for help means inviting an inspection. It doesn’t work that way.
Roughly half of US states run their own OSHA-approved state plans, which can carry additional or different requirements than federal OSHA. If you operate in one of those states, check your state plan directly rather than assuming federal rules are the full picture. For municipal and infrastructure projects specifically, standards compliance often ties directly into contract eligibility, a point covered in more detail in this guide to compliance standards in industrial painting.
What Mistakes Keep Employers Out of Compliance?
The single most common failure is a reactive posture: employers who treat safety as a response to an incident or an inspection rather than an ongoing organizational value. That mindset shows up in a few recognizable patterns.
- Reactive-only programs. Nothing changes until an injury forces it, and even then the fix often addresses the symptom, not the root cause.
- Skipping JSAs on “routine” tasks. The tasks workers have done a thousand times are often exactly where complacency creates the conditions for an injury.
- Leaning on PPE instead of engineering controls. It’s cheaper up front and feels like action, but it leaves the underlying hazard fully intact.
- Excluding workers from hazard identification. Programs written entirely by management miss the day-to-day realities of the job.
Each of these has a practical, low-cost fix. Housekeeping hazards, cluttered walkways, blocked exits, unmarked spills, can usually be corrected the same day they’re spotted, at no cost. High-risk hazards identified through JSAs should jump the queue for elimination or engineering fixes rather than sitting on a maintenance backlog behind lower-priority work. And for employers unsure where to start, OSHA’s On-Site Consultation program exists specifically to close this gap without the risk of a citation.
An employer who fixes a blocked fire exit the moment it’s noticed, rather than logging it for next week’s maintenance round, sends a clearer safety message than any poster or training video ever will.
A project team that runs abrasive blasting inside a facility with limited ventilation illustrates the fix-to-outcome chain well. Without engineering controls, the crew relies almost entirely on respirators and depends on flawless compliance, shift after shift. Add localized exhaust ventilation and containment, and exposure drops regardless of whether every worker’s mask fits perfectly that day. The engineering fix protects people even when human compliance isn’t.
Pro Tip: If your safety budget is tight, spend it on the one or two engineering fixes that address your highest-severity hazards first. A single ventilation upgrade often does more for compliance and injury prevention than a year’s worth of additional PPE purchases.
What Templates Do You Need to Get Started?
You don’t need to build every form from scratch. A handful of templates cover most of what a functioning safety program requires:
- Inspection checklist: A repeatable walkthrough form covering the same areas every time.
- JSA form: Task steps, hazards, and controls in a simple three-column layout.
- Incident investigation form: Scene details, witness statements, root cause findings, and corrective actions with deadlines.
- Hazard control plan: A running log of identified hazards, assigned controls, and completion status.
- Training sign-in and evaluation forms: Attendance records paired with a quick comprehension check.
To adapt any of these to your own workplace:
- Start with OSHA’s free templates rather than building from a blank page.
- Adjust hazard categories to match your actual industry, chemical use, and equipment.
- Have your safety lead and at least one worker representative review the draft before rollout.
- Require sign-off from a supervisor and the safety lead before a template goes into active use.
- Revisit each template annually, or immediately after any process change.
OSHA’s self-evaluation tool, implementation checklist, and Small Business Safety and Health Handbook all provide ready-to-use starting points, particularly useful if you’re building a program without a dedicated safety department.
Store finished templates somewhere version-controlled, a shared drive with access logs, a learning management system, or dedicated EHS software, rather than scattered across individual inboxes. When an OSHA inspector or an auditor asks for your current hazard control plan, you want one authoritative version, not three conflicting copies from different departments.
If your project involves surface preparation or coatings work, Southernsandblastingandpainting’s guide on surface prep best practices for long-lasting coatings walks through how these templates apply on an active industrial job site, from pre-blast inspection through final coating inspection.
Why Prevention and Engineering Controls Matter on Every Job
At Southern Sandblasting and Painting, our crews spend their days in the exact conditions this article describes: abrasive blasting environments, confined spaces, elevated platforms, and chemical coatings work where a shortcut on hazard control can turn into a serious injury fast. We prioritize engineering controls, containment, ventilation, and enclosure, over relying on PPE alone, because we’ve seen how much more reliable a fixed engineering solution is compared to hoping every worker uses protective gear correctly on every shift, for years.
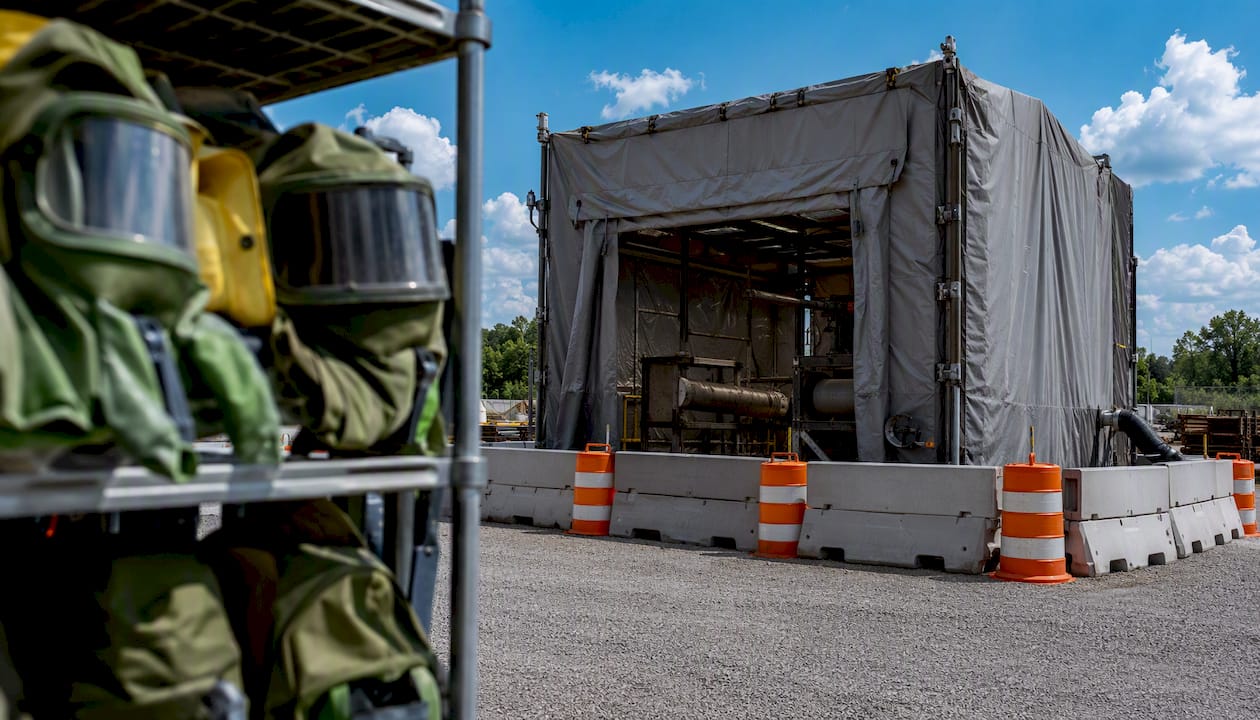
On a recent municipal water tank restoration project, our team replaced open-air abrasive blasting with a fully contained blast enclosure and dedicated exhaust ventilation before work began. The switch reduced airborne particulate exposure for the crew and surrounding facility staff, and it kept the project aligned with both OSHA hazard control expectations and the municipality’s own environmental compliance requirements. It also meant fewer PPE-related delays, since the crew wasn’t stopping work every time a respirator fit-check flagged an issue.
[Author credentials and additional case study links to be added.]
Where Can You Find Official Safety Standards Resources?
- OSHA Recommended Practices for Safety and Health Programs, the step-by-step framework this entire guide is built around.
- OSHA’s Recommended Practices PDF (OSHA3885), including the self-evaluation checklist.
- Hazard Identification and Assessment guidance covering the hierarchy of controls in depth.
- Job Safety Analysis training manual for building your own JSA process.
- Small Business Safety and Health Handbook, a strong starting point if you’re building a program without a dedicated safety department.
- Employer responsibilities overview covering PPE, training, recordkeeping, and reporting duties.
If your state runs its own OSHA-approved plan, check its specific requirements before assuming federal rules cover everything, and reach out to your local On-Site Consultation office for free, confidential guidance that won’t result in a citation. For project-level support on surface preparation and industrial coatings work that needs to meet these standards from the ground up, Southernsandblastingandpainting’s surface preparation workflow guide is a useful next stop.
Sources
- Recommended Practices for Safety and Health Programs – OSHA
- Recommended Practices for Safety and Health Programs (OSHA3885.pdf)
- Hazard Assessment and Job Safety Analysis (HA and JSA training manual)
- Hazard identification and assessment – OSHA
- Safety and Health Employer Responsibilities – Employer


