TL;DR:
- Proper surface preparation to SSPC-SP10 standards is essential for water tank coating success and longevity.
- Selecting appropriate coating systems for internal and external zones, following recoat windows, and regular inspections ensure durability and compliance.
Painting water tanks is defined as the process of applying protective coatings to both internal and external surfaces of industrial storage tanks to prevent corrosion, maintain water quality, and meet regulatory compliance standards. Done correctly, it extends tank service life by decades. Done poorly, it fails within months. The process demands strict surface preparation to SSPC-SP10 standards, the right coating chemistry for each surface zone, and a disciplined application workflow. This guide gives facility managers and maintenance personnel the exact steps, standards, and product knowledge to get it right the first time.
How to paint water tanks: requirements and tools you need first
Before any coating touches a tank surface, you need a clear picture of what you are working with. Inspect the tank for existing coating condition, active corrosion, pitting depth, and any structural repairs needed before prep begins. Skipping this step means you may blast and coat over a surface that still needs welding or mechanical repair, which wastes both time and materials.
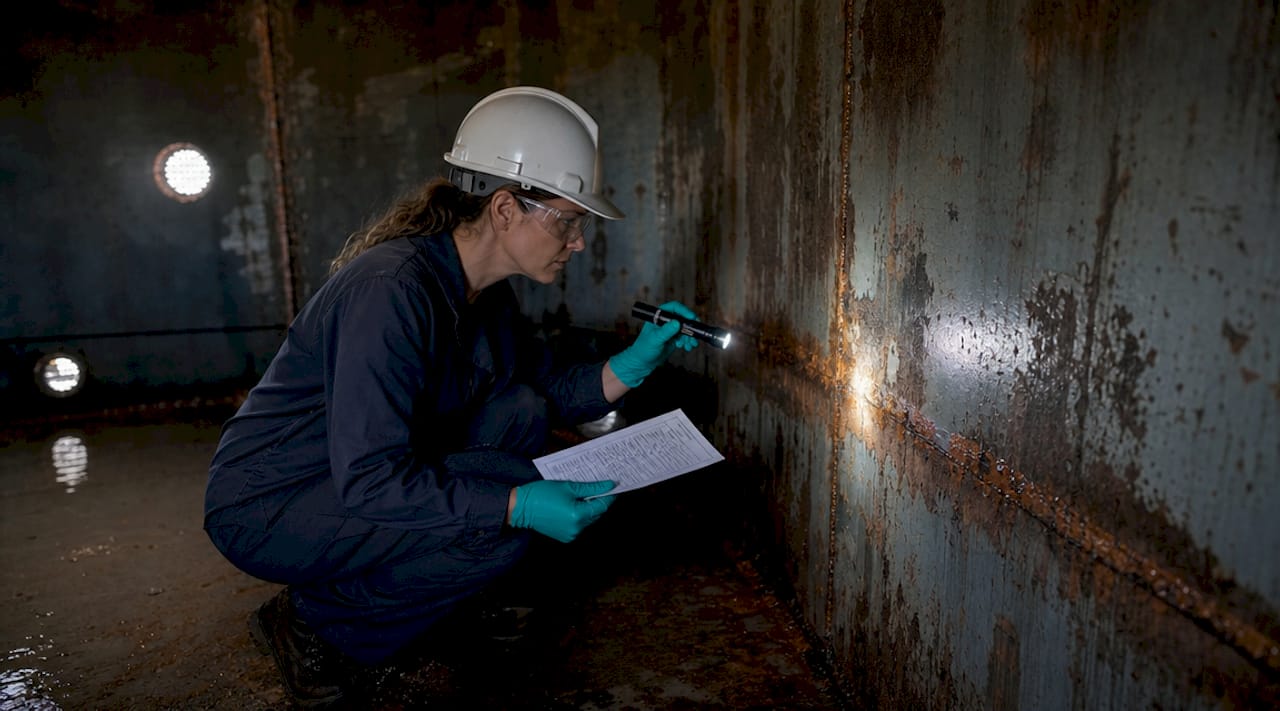
Surface preparation is the single most critical variable in tank coating success. Most premature lining failures result from inadequate surface prep, not the coating system itself. That finding should reset your priorities: spend more time and budget on prep than on product selection.
The standard for high-performance tank linings is SSPC-SP10 near-white metal blast, which removes 95% or more of all contaminants and permits only minor residual staining. Acceptance is verified visually against ISO 8501-1 Sa 2½ reference panels, and anchor profile is measured using ASTM D4417 replica tape to confirm mechanical bond depth between 50 and 100 µm.
Essential tools and materials checklist:
- Abrasive blast equipment (or a Bristle Blaster® for ATEX-restricted zones)
- Soluble salt test kits (Bresle patch or equivalent)
- ASTM D4417 replica tape for anchor profile measurement
- Wet film thickness gauge and dry film thickness (DFT) gauge
- Holiday detector for pinhole testing
- Coating manufacturer’s technical data sheets (TDS) for every product
- Appropriate respirators, full-body suits, and confined-space entry equipment
- Dew point meter and psychrometer for environmental monitoring
Environmental controls matter as much as tools. Coating must not be applied when the steel surface temperature is within 3°C of the dew point, when relative humidity exceeds the TDS limit, or when rain is forecast within the curing window. Document all environmental readings before each coat.
| Preparation check | Acceptance criterion |
|---|---|
| Surface cleanliness | SSPC-SP10 / ISO Sa 2½ |
| Anchor profile | 50 to 100 µm (ASTM D4417) |
| Soluble salt level | Below 5 µg/cm² for marine or potable service |
| Surface temperature | Minimum 3°C above dew point |
| Relative humidity | Per coating TDS (typically below 85%) |

Pro Tip: Always read the coating TDS before mobilizing equipment. Pot life, recoat windows, and surface temperature limits vary significantly between products, and discovering a conflict on-site costs far more than reading the sheet in advance.
How to prepare metal and plastic water tanks for painting
Preparation methods differ significantly between steel and polyethylene tanks, and confusing the two approaches is a common source of early coating failure.
Steel tank preparation
- Remove all loose rust, scale, and existing failed coatings using power tools or hand tools to achieve at minimum SSPC-SP3 before blasting.
- Perform abrasive blast cleaning to SSPC-SP10 standard, achieving the required anchor profile and visual cleanliness.
- Test for soluble salt contamination using a Bresle patch kit. Elevated soluble salts cause osmotic blistering under coatings even on otherwise clean steel, so confirm levels are below the TDS threshold before proceeding.
- Wash with fresh water if salt levels exceed limits, allow to dry fully, and retest before applying primer.
- Apply primer within the overcoating window specified in the TDS. Delays beyond this window require re-blasting.
Plastic (polyethylene) tank preparation
- Clean the tank surface thoroughly with a degreasing agent to remove oils, mold release agents, and environmental contamination.
- Scuff the surface with 80 to 120 grit sandpaper or a mechanical scuff pad to create mechanical adhesion. Do not over-sand, as deep scratches can create stress points in the plastic.
- Wipe down with isopropyl alcohol and allow to dry completely.
- Apply a primer specifically formulated for polyethylene or flexible substrates. Plastic tanks respond well to acrylic or flexible elastomeric coatings, while epoxy systems designed for steel will not bond reliably to untreated polyethylene.
- Apply topcoat within the primer’s recoat window.
Pro Tip: For polyethylene tanks in direct sun, choose a light-colored topcoat. Light-colored tanks such as beige or light green absorb significantly less heat than dark colors, which reduces UV degradation and extends coating life in hot climates like Central Florida.
What are the best paint types for internal and external tank surfaces?
Coating selection is driven by the service environment, the substrate, and the regulatory requirements of the stored liquid. Getting this wrong is expensive.
Internal linings for potable and process water
Solvent-free epoxy is the industry standard for internal tank linings. It offers chemical resistance, low permeability, and compatibility with potable water service when formulated to meet NSF/ANSI 61 certification. Industrial water tanks use solvent-free epoxy linings internally because solvent-based products off-gas into stored water and fail compliance testing. For tanks storing aggressive chemicals or high-temperature water, novolac epoxy or vinyl ester systems provide additional resistance.
External coating systems
External surfaces face UV radiation, moisture, and atmospheric corrosion. The standard approach combines a zinc-rich primer for galvanic protection, an epoxy intermediate coat for barrier protection, and a polyurethane topcoat for UV resistance and color retention. ISO 12944 corrosion categories C4 and C5 help specify which system is appropriate for coastal or heavy industrial environments. A tank near the Florida coast, for example, requires a C5-M rated system with a zinc-rich primer and a minimum total DFT of 320 µm.
| Coating type | Application zone | Key property | Compliance note |
|---|---|---|---|
| Solvent-free epoxy | Internal lining | Chemical resistance, low permeability | NSF/ANSI 61 required for potable water |
| Zinc-rich primer | External primer coat | Galvanic corrosion protection | ISO 12944 C4/C5 rated systems |
| Epoxy intermediate | External mid-coat | Barrier protection, adhesion | Per manufacturer TDS |
| Polyurethane topcoat | External finish | UV resistance, color retention | Matches ISO 12944 category |
| Elastomeric acrylic | Plastic tank exterior | Flexibility, adhesion to PE | No blast prep required |
For more on coating types and lifespan in Florida’s climate, the regional conditions add humidity and UV load that push most tanks toward C4 or C5 system specifications.
What is the step-by-step process for painting water tanks?
A disciplined application sequence is what separates a coating that lasts 15 years from one that fails in 18 months.
- Complete all surface prep and inspections before opening any coating containers. Confirm cleanliness, anchor profile, salt levels, and environmental conditions are all within spec.
- Apply primer within the blast-to-coat window specified in the TDS. For zinc-rich primers, this window is often 4 to 8 hours. Missing it means re-blasting.
- Allow primer to cure to the minimum overcoating time before applying the intermediate coat. Rushing this step traps solvents and causes intercoat adhesion failure.
- Apply intermediate coat and measure wet film thickness during application to confirm you are hitting the target DFT. Adjust spray pressure or pass speed as needed.
- Apply topcoat within the recoat window. Paint applied outside the recoat window requires additional surface prep to restore bond, adding cost and time.
- Inspect each coat using a DFT gauge and holiday detector before applying the next layer. Document all readings.
- Allow full cure before returning the tank to service. Potable water tanks require a cure and flush protocol per NSF/ANSI 61 before water contact.
Application methods by surface zone:
- Spray application (airless or conventional): fastest and most uniform for large flat surfaces; requires masking and overspray control
- Brush application: preferred for welds, crevices, and stripe coats on edges where spray underapplies
- Roller application: suitable for intermediate coats on accessible exterior surfaces; slower than spray but reduces overspray
Pro Tip: Always apply a stripe coat by brush to all welds, edges, and bolt holes before each spray coat. Edges shed coating faster than flat surfaces, and stripe coats are the most cost-effective way to prevent early edge corrosion.
The industrial painting process for water tanks also requires a multi-coat application system with defined DFT and curing times for each layer, with holiday detection as a mandatory final inspection step.
How to troubleshoot common issues and maintain painted water tanks
Even well-applied coatings eventually need attention. Knowing the failure signs and their causes lets you intervene before a localized problem becomes a full recoat.
Common failure signs and their causes:
- Blistering: osmotic pressure from soluble salts trapped under the coating or moisture ingress through a pinhole. Requires localized removal, re-prep, and patch coating.
- Peeling or delamination: intercoat adhesion failure, usually from missing the recoat window or applying over a contaminated surface.
- Cracking or checking: coating applied too thick in a single coat, or a rigid coating applied over a flexible substrate.
- Rust staining at edges or welds: inadequate stripe coat coverage or insufficient DFT at sharp edges.
- Chalking on exterior: normal UV weathering of epoxy topcoats. Switch to polyurethane topcoats to extend color and gloss retention.
Pro Tip: Schedule a documented visual inspection every 12 months for external surfaces and every 3 to 5 years for internal linings, depending on water chemistry and operating temperature. Inspection and documentation practices are critical for warranty compliance and long-term maintenance planning.
For touch-up work, spot-blast or power-tool clean the affected area to the original prep standard, feather the edges of the existing coating, and apply the same coating system used originally. Using a different product risks intercoat compatibility issues. The benefits of asset coating for water tanks are only realized when maintenance is treated as a scheduled program, not a reactive response.
Key takeaways
Successful water tank painting requires SSPC-SP10 surface preparation, the correct coating system for each zone, and strict adherence to recoat windows and inspection protocols at every stage.
| Point | Details |
|---|---|
| Surface prep is the priority | Most coating failures trace back to inadequate prep, not the coating product itself. |
| Match coating to service zone | Use NSF/ANSI 61 solvent-free epoxy internally and zinc-rich plus polyurethane systems externally. |
| Respect recoat windows | Missing the manufacturer’s recoat window requires re-blasting and adds significant cost. |
| Inspect every coat | Measure DFT and run holiday detection before applying each subsequent layer. |
| Schedule maintenance inspections | Annual external and 3 to 5 year internal inspections protect warranty and extend tank life. |
What 20 years of tank coating work has taught me about getting it right
The most common mistake I see facility managers make is treating surface preparation as a cost to minimize rather than a result to achieve. Teams will spend weeks selecting the right epoxy system and then cut the blast schedule short because the weather window is closing or the contractor is pushing to move on. That decision is where most tank coating projects fail.
Recoat timing coordination with weather and shift schedule is often a bigger determinant of final coating durability than the product you select. I have seen premium coating systems fail in under two years because the intermediate coat sat past its recoat window over a weekend. I have also seen budget-tier products outlast their rated service life because the prep and application timing were executed precisely.
The regulatory side is tightening. NSF/ANSI 61 compliance for potable water tanks is no longer optional in most jurisdictions, and documentation of DFT readings, holiday test results, and inspector sign-offs is increasingly required for municipal contracts. Build that documentation habit now, because it protects both the asset and your organization’s liability position.
The trend worth watching in 2026 is the adoption of tools like the Bristle Blaster® for SSPC-SP10 compliance in confined or hazardous spaces where traditional abrasive blasting is restricted. It does not replace full blast prep on large open surfaces, but it gives maintenance teams a legitimate option for spot repairs and confined-space work without the logistics of a full blast mobilization.
— Southernsandblastingandpainting
Professional water tank coating services in Central Florida

Southernsandblastingandpainting has delivered industrial-grade surface preparation and protective coatings for water tanks, municipal infrastructure, and commercial facilities across Central Florida for over 20 years. The team applies SSPC-SP10 blast standards, NSF/ANSI 61 compliant internal linings, and ISO 12944-rated external systems on every tank project. Whether you are managing a municipal water tower, an industrial process tank, or a large-scale storage facility, professional sandblasting services and industrial painting expertise make the difference between a coating that lasts and one that fails inspection. Contact Southernsandblastingandpainting for a project assessment and specification review before your next tank maintenance cycle.
FAQ
What surface prep standard is required for water tank painting?
SSPC-SP10 near-white metal blast is the standard requirement for high-performance tank linings, removing 95% or more of contaminants and achieving an anchor profile of 50 to 100 µm verified by ASTM D4417 replica tape.
What is the best paint for internal water tank linings?
Solvent-free epoxy formulated to NSF/ANSI 61 is the industry standard for internal linings on potable water tanks, providing chemical resistance and compliance with drinking water contact regulations.
How do you prepare a plastic water tank for painting?
Clean the surface with a degreaser, scuff with 80 to 120 grit sandpaper for mechanical adhesion, wipe with isopropyl alcohol, and apply a primer formulated for polyethylene before topcoating with an acrylic or elastomeric coating.
How often should painted water tanks be inspected?
External surfaces require a documented visual inspection annually, while internal linings should be inspected every 3 to 5 years depending on water chemistry, operating temperature, and coating system type.
What causes blistering on water tank coatings?
Blistering results from osmotic pressure caused by soluble salts trapped beneath the coating or moisture ingress through pinholes. Confirming salt levels below 5 µg/cm² before coating application is the primary prevention measure.


