
A concrete surface profile (CSP) is the quantified texture of prepared concrete, measured on a scale of 1 to 10, and it determines whether a coating or overlay actually bonds or peels off within a year. Get the CSP wrong and you get delamination, blistering, or a warranty claim. Get it right and the coating system performs the way the manufacturer’s data sheet promises.
Four documents govern this conversation: ICRI Guideline No. 310.2R, which defines the CSP 1–10 comparator chips; ASTM D7682, the replica putty method; ASTM D8271, the direct depth micrometer method; and AMPP SP21513, which governs sampling and acceptance. Before any blasting or grinding starts, do this:
- Write the required CSP range and the exact measurement method into the contract, not just “roughen the surface”
- Confirm the coating manufacturer’s data sheet CSP recommendation matches what the spec calls for
- Verify the finished profile on-site with the specified method before the first coat goes on
Pro Tip: A profile that “looks rough enough” to the naked eye can still read two full CSP numbers off target. Measure it. Don’t eyeball it.
Table of Contents
- What Do the CSP Numbers Mean? A Quick Reference
- How Is CSP Measured? Chips, Putty, and Digital Micrometers
- Which Surface Prep Method Gets You the CSP You Need?
- Writing a Spec That Actually Holds Up: Sampling and Acceptance
- Equipment You’ll Actually Use for CSP Testing
- What Field Experience Teaches About CSP Verification
- Where to Find the Standards and Equipment Referenced Here
- Why Standards Alone Don’t Guarantee a Good Bond
- Get Your Concrete Surface Profile Verified Before the Coating Goes On
- Frequently Asked Questions
- Sources
What Do the CSP Numbers Mean? A Quick Reference
Contractors rarely need a textbook definition of surface roughness. They need to know what CSP 4 looks like versus CSP 7, and which coating jobs call for which number. Here’s the practical breakdown, following the ICRI 310.2R framework.
- CSP 1: Near-flat, fine texture typical of acid etching. Used under thin sealers and penetrating treatments with minimal film build.
- CSP 2: Light texture from grinding or light shotblasting. Suits thin-film coatings and some floor sealers.
- CSP 3: Fine to medium texture, often from light abrasive blasting. Common under epoxy coatings in light-duty commercial floors.
- CSP 4: Medium texture, typically medium shotblasting. A frequent target for standard epoxy and polyurethane floor systems.
- CSP 5: Medium to coarse profile, often from heavier shotblasting or abrasive blasting. Used for high-build coatings and traffic-bearing systems.
- CSP 6: Coarse profile from scarification or aggressive shotblasting. Common for polymer overlays and thick-build systems.
- CSP 7: Coarse, aggressive texture from scarifying or milling. Used ahead of thick repair mortars and heavy-duty overlays.
- CSP 8: Very coarse, produced by heavy scarification. Suited to thick structural repairs.
- CSP 9: Rough, jagged texture from handheld breakers or heavy mechanical removal, used for deep repairs and rebar exposure.
- CSP 10: The most aggressive profile ICRI recognizes, added to the guideline for extreme repair scenarios where deep bonding is critical and the substrate needs maximum mechanical key.
That addition of CSP 10 to the ICRI guideline matters because older projects specified only up to CSP 9, which left aggressive structural repair work without a defined comparator. If your project involves deep spall repair or full-depth patching, confirm your spec references the updated 10-point scale rather than the older 9-point version.
How Is CSP Measured? Chips, Putty, and Digital Micrometers
Three methods dominate the industry, and each one produces a number that means something slightly different. Mixing them up in a contract is one of the most common sources of coating disputes.
ICRI comparator chips are the simplest tool: a set of ten rubber chips, each molded to represent CSP 1 through 10. An inspector holds a chip against the prepared concrete and picks the closest visual and tactile match. It’s fast and cheap, but it’s qualitative. Two inspectors can reasonably disagree by one number, especially between adjacent profiles like CSP 4 and CSP 5.
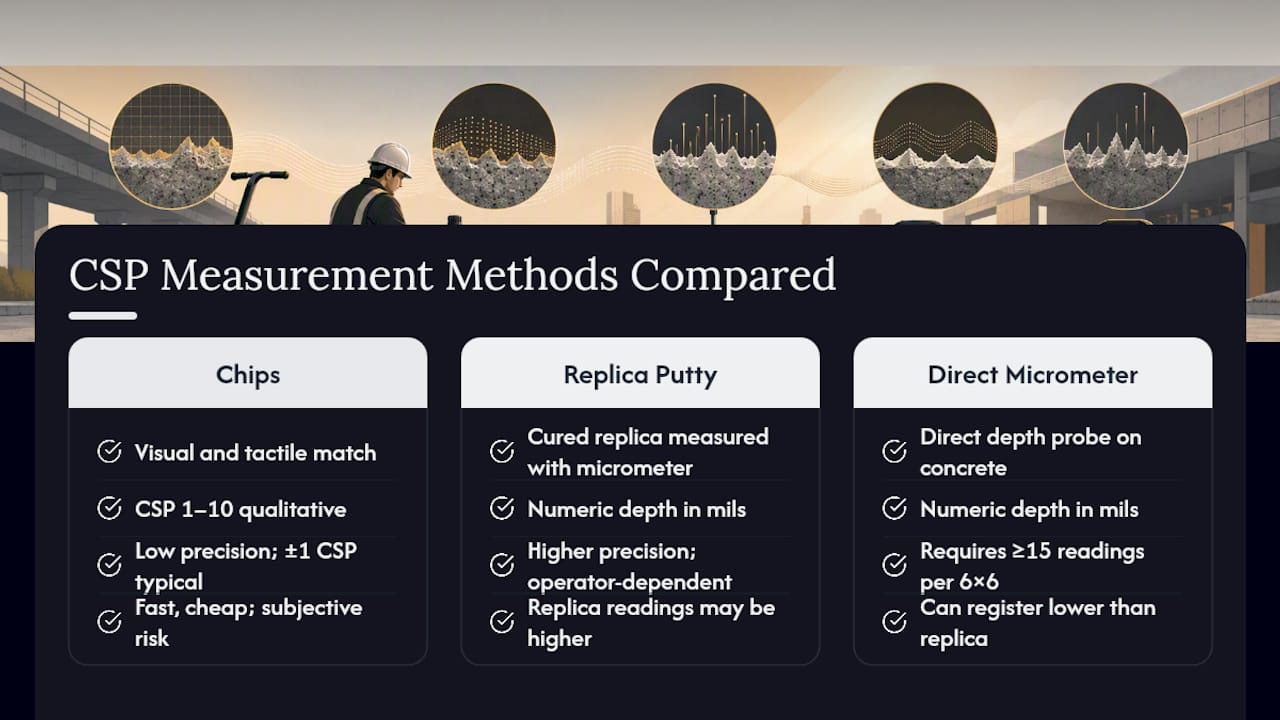
ASTM D7682 (replica putty, Method B) gets more precise. You press a two-part putty compound onto the surface, let it cure, peel it off, then measure the replica’s peak-to-valley depth with a dial or digital micrometer. This produces an actual numeric value in mils rather than a visual guess, though it still depends on how carefully the replica is pulled and measured.
ASTM D8271 (direct measurement) skips the replica entirely. A digital depth micrometer with a 60 degree pointed probe reads the profile straight off the concrete. ASTM D8271 requires a minimum of 15 readings per 6 inch by 6 inch test area, with instruments rated for a range up to roughly 6 millimeters, or 250 mils.
Here’s the part that trips up a lot of specifiers: direct micrometer readings and replica putty readings don’t always agree on the same surface. Vendor testing on epoxy replicas correlated against depth micrometer readings found that direct measurement often registers a lower profile height than the replica method on identical concrete. That’s not measurement error. It’s a systematic difference between the two techniques, and it means a spec that says “CSP 5 minimum” without naming the method leaves room for argument. Name the method in the contract, not just the number.
Which Surface Prep Method Gets You the CSP You Need?
Every prep method has a characteristic CSP range it tends to produce, though variables like aggregate hardness and equipment settings shift results within that band.
- Acid etching produces CSP 1, sometimes CSP 2. Cheap and fast, but weak mechanical bond and heavily dependent on proper neutralization.
- Grinding typically lands CSP 1 to 3. Good for smoothing high spots and light texture ahead of thin coatings, but it can burnish the surface if diamond grit is too fine.
- Light to medium shotblasting generally produces CSP 2 to 5, the workhorse range for most commercial floor coating jobs.
- Heavy shotblasting or abrasive blasting (sand, garnet, or other media) reaches CSP 4 to 7, useful when the substrate has laitance or surface contamination that needs removal along with texturing.
- Scarification produces CSP 6 to 9, aggressive enough to remove thin toppings or heavily degraded concrete.
- Water jetting covers a wide band, roughly CSP 3 to 8, depending on pressure, and it has the advantage of leaving no spent media to contain or dispose of.
- Handheld breakers and scabblers produce CSP 8 to 10, reserved for deep structural repair prep rather than general coating work.
Choosing among these comes down to more than the target number. Substrate condition drives a lot of it: a slab with surface laitance needs abrasive removal, not just texture. Coating manufacturer requirements matter too. Access and containment constraints on an occupied facility can rule out shotblasting in favor of a smaller-footprint method. Production rate and cost round out the decision: scarification moves fast on large slabs but generates more dust and vibration than grinding.
Pro Tip: If a job site has strict noise or vibration limits near occupied space, don’t default to scarification just because it hits a high CSP number fast. Water jetting often reaches the same profile with far less disruption, though it trades dust for water management.
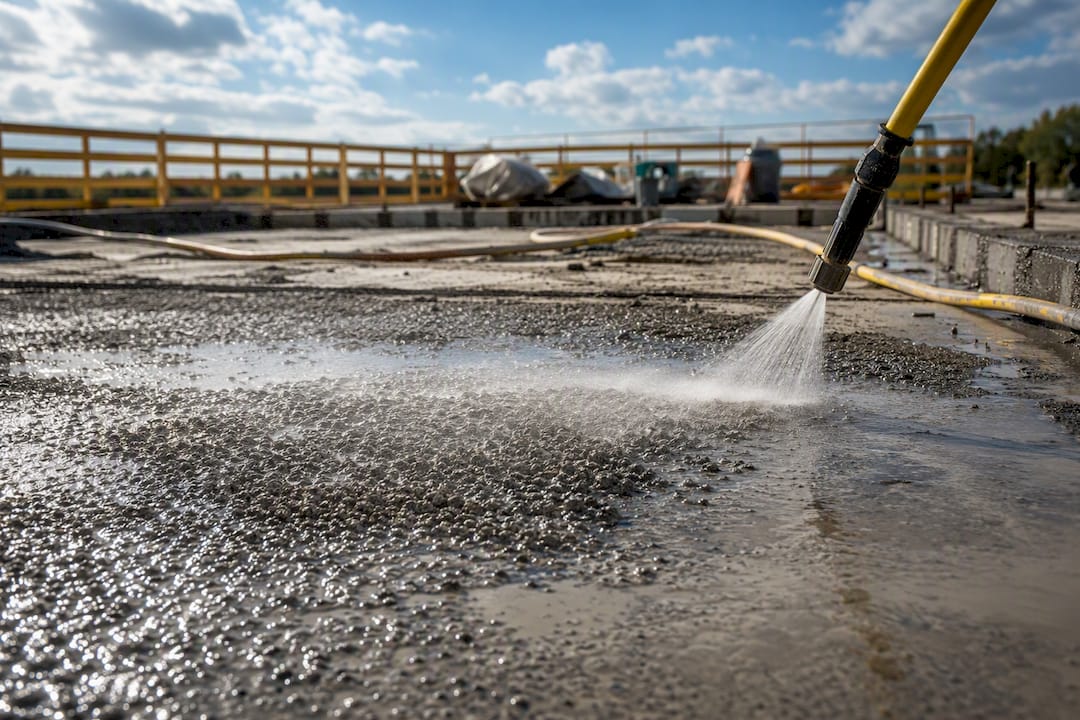
Environmental and safety considerations aren’t optional extras. Dry blasting methods generate silica dust that requires respiratory protection and containment under OSHA’s crystalline silica rule. Water jetting eliminates airborne dust but produces slurry that needs collection and proper disposal. Choosing a prep method without weighing these factors is how projects end up with change orders mid-job. Our guide to surface prep equipment types breaks down which machines suit which site constraints in more detail.
Writing a Spec That Actually Holds Up: Sampling and Acceptance
A CSP requirement that just says “achieve CSP 4” invites disputes the day someone measures CSP 3.5 in one corner of the slab. Build the spec clause with four elements:
- The measurement method, named explicitly. Choose ICRI chips, ASTM D7682 replica putty, or ASTM D8271 direct measurement, and require the contractor and inspector to use the same one.
- The acceptable CSP range, not a single target number. A range like “CSP 4 to 5” accounts for normal variation in blast media and substrate.
- The sampling frequency and location, following AMPP SP21513 guidance on where and how often to test across the prepared area.
- The tolerance and remedy if readings fall outside range, including whether the contractor re-blasts, applies additional passes, or the owner accepts the result with documentation.
AMPP SP21513 exists specifically to close the gap between “the chip looked about right” and a defensible conformance decision, giving owners, contractors, and inspectors a shared procedure for determining acceptability rather than relying on individual judgment call after individual judgment call.
For QC records, keep it simple but complete:
- Photograph each test location alongside the comparator chip or replica used
- Log every reading in a chart, not scattered notes, with location coordinates on a slab plan
- Note ambient conditions (temperature, humidity, surface moisture) at time of testing
- Document any remediation and re-test results before final sign-off
A workflow like this fits naturally into the broader surface preparation workflow contractors use across industrial projects, where CSP verification is one checkpoint among several before coating crews mobilize.
Equipment You’ll Actually Use for CSP Testing
The tool list for CSP verification is short, but each piece has to meet a standard, not just look the part.
- ICRI PC1-10 chip set: the standard ten-piece comparator kit covering CSP 1 through 10, often paired with TACM concrete samples for a more tactile, in-the-field reference.
- Replica putty kits: two-part compounds per ASTM D7682, used with a dial or digital micrometer to measure the cured replica’s peak-to-valley depth.
- Digital depth micrometers: instruments like the PosiTector SPG TS use a pointed probe rated to roughly 250 mils, meet ASTM D8271 geometry requirements, and store readings for direct download into a QC report.
- Calibration checks: verify probe zero and range against a known reference before critical measurements, and log the calibration date in the project file.
Documentation matters as much as the reading itself. A digital gauge that exports a spreadsheet of 15 readings per test area beats a handwritten note that just says “CSP 5, looked good,” particularly on municipal or government contracts where the paper trail gets audited.
What Field Experience Teaches About CSP Verification
Standards tell you what number to hit. Field experience tells you how to hit it without wasting a shift. Southern Sandblasting & Painting has run CSP verification into the standard workflow on projects ranging from water tank interiors to airport pavement markings, and a few habits consistently prevent rework.
- Run a small test patch before committing to full production, confirming the chosen method actually delivers the specified CSP on that specific concrete before blasting an entire tank floor or runway section.
- Match containment to the method: shotblasting recovers most of its media internally, abrasive blasting needs tarping and collection, and water jetting needs slurry containment and drainage planning.
- Assign one person to take and record every CSP reading per test area, using the same instrument throughout, so results are comparable across the job.
Pro Tip: Run your test patch in the least accessible corner of the job, not the easiest spot. If the method works there, it will work everywhere else on the slab.
This kind of pre-production testing, paired with our surface prep best practices for cleanup and QC, is what separates a coating system that lasts a decade from one that needs recoating in eighteen months.
Getting the specified CSP right on-site depends on matching the measurement method to the standard named in the contract every time.
| Point | Details |
|---|---|
| CSP defines bond potential | The 1 to 10 scale predicts whether a coating mechanically keys into the surface or sits on top of it. |
| Name the method in the spec | ICRI chips, ASTM D7682 replica putty, and ASTM D8271 direct measurement can yield different numbers on the same slab. |
| Minimum readings matter | ASTM D8271 requires at least 15 readings per 6 inch by 6 inch test area to be valid. |
| Sampling plans prevent disputes | AMPP SP21513 gives owners and contractors a shared procedure for testing frequency and acceptability. |
| Southern Sandblasting & Painting verifies before coating | The crew runs test patches and logs CSP readings on-site before full production begins on any project. |
Where to Find the Standards and Equipment Referenced Here
For spec language, start with ICRI 310.2R. For measurement procedure detail, reference ASTM D8271 and the KTA-Tator technical overview. Purchase comparator chip sets directly through ICRI’s store, and check coating compatibility against resources like ASTRA Chemical’s adhesion promoter guide when primer chemistry is part of the acceptance conversation.
Why Standards Alone Don’t Guarantee a Good Bond
The standards get treated like a finish line: hit CSP 5, pass the test, move on. That’s backward. The standards define what to measure, not whether the measurement matches what the coating actually needs on that particular substrate. A CSP 5 reading on a dense, well-cured slab behaves nothing like CSP 5 on a porous, moisture-retentive one, and no comparator chip captures that difference.
The gap in most projects isn’t a missing standard. It’s a missing method name in the contract. Owners write “achieve CSP 4 to 6 per ICRI” and never specify whether that’s chip comparison or direct micrometer reading, then act surprised when the contractor’s number and the inspector’s number don’t match. Fix that one sentence in the spec and half the disputes disappear before they start.
What deserves more attention than it gets: the test patch. Everyone skips it to save an hour, then loses three days re-blasting an entire slab because the method didn’t produce the target profile at scale. Run the small area first. It’s the cheapest insurance on the job.
Get Your Concrete Surface Profile Verified Before the Coating Goes On
Reading standards is one thing. Running a depth micrometer across a 40,000 square foot warehouse floor at 6:00 AM before a coating crew shows up is another. Southern Sandblasting & Painting handles both ends of the job: the surface preparation that hits your specified CSP range, and the on-site verification that documents it before anyone opens a coating can. That combination matters most on municipal and industrial contracts, where a paper trail of chip comparisons or logged micrometer readings is often required for final payment.
The company works across water tanks, pipelines, airport surfaces, and city infrastructure throughout Central Florida, applying the same measurement discipline covered in this guide on every job. If your next project needs a CSP range hit, verified, and documented, start by reviewing the sandblasting and painting services Southern provides, then request a project quote to get your specification matched to the right prep method before work begins.
Frequently Asked Questions
What CSP range do most epoxy floor coatings require?
Most standard epoxy floor systems call for CSP 3 to 5, though high-build or heavy-traffic systems can require CSP 5 to 7. Always confirm the exact range against the coating manufacturer’s data sheet rather than assuming a default.
Can I use ICRI comparator chips instead of a digital micrometer?
Yes, ICRI chips are an accepted qualitative method under 310.2R, but they introduce more inspector-to-inspector variation than direct measurement. For contracts requiring documented, defensible numbers, ASTM D8271 direct measurement or ASTM D7682 replica putty is the stronger choice.
What happens if the measured CSP doesn’t match the spec?
The contract should define the remedy in advance: additional passes of the prep method, re-blasting the affected area, or a documented owner acceptance with rationale. Without that clause written in beforehand, disputes over rework and cost responsibility drag out.
Does a higher CSP number always mean a better bond?
No. Going higher than the coating manufacturer specifies can create air voids and pinholing as the coating struggles to fill an overly aggressive profile. Matching the CSP to the coating system’s requirement matters more than maximizing texture.
How often should CSP be tested across a large slab?
AMPP SP21513 provides guidance on sampling frequency and location based on total area, and ASTM D8271 requires a minimum of 15 readings within each 6 inch by 6 inch test zone tested. Larger floors need multiple test zones distributed across the surface, not just one corner.
Sources
- ASTM D8271-21 Standard Test Method for the Direct Measurement of Surface Profile of Prepared Concrete
- ICRI Guideline No. 310.2R-2013 selecting and specifying concrete surface preparation
- How to Digitally Measure Concrete Surface Profile (CSP) — DeFelsko
- Correlating qualitative surface profile assessment methods to quantitative methodology on prepared concrete (AMPP conference paper / proceedings)
- Measuring the surface profile of prepared concrete — KTA-Tator


