

Every accessible parking space needs a sign with the International Symbol of Accessibility mounted at least 60 inches to the bottom edge, a van-accessible designation where required, a minimum width space for cars, a wider configuration for vans, or a car-width space paired with a wide adjacent access aisle, and a suitably wide access aisle. The 2010 ADA Standards set the required count per facility, and the U.S. Access Board’s Chapter 5 guidance confirms color and marking method are left to local codes. Restriping an existing lot legally triggers full compliance. Every restriping project should be built around these federal baselines first.
TL;DR:
- All accessible parking signs must have their bottom edge mounted at least 60 inches above the pavement to ensure visibility from a vehicle.
- Spaces must meet specific width and layout standards, including minimum widths, proper access aisle width, and correct surface slope to comply with federal and local codes.
- Restriping triggers immediate ADA compliance requirements, including surface prep and correct measurements, with no grandfathering for outdated layouts.
- Proper surface preparation, use of durable paint, and regular inspections are crucial for markings to last beyond a single season and maintain compliance.
- Placement of accessible spaces must be proportional and on the shortest, unobstructed route to accessible building entrances, with proper signage and clear routes mandated.
Table of Contents
- Quick ADA Parking Marking Requirements Checklist
- Exact Measurements for Parking Spaces, Aisles, and Signs
- How Do You Calculate Required Accessible Spaces?
- Marking and Painting Practices That Hold Up Over Time
- Where Should Accessible Spaces Be Located?
- When Does Restriping Trigger ADA Compliance?
- What Southern Sandblasting & Painting Sees on Real Restriping Projects
- Coordinate Maintenance Cycles With ADA Upgrades
- Get Compliant Restriping Done Right the First Time
- Where to Go for the Official ADA Parking Rules
- Sources
Quick ADA Parking Marking Requirements Checklist
Before a crew rolls out striping equipment or a property manager signs off on a restriping bid, run through this list. It catches the mistakes inspectors flag most often.
- Confirm a sign with the International Symbol of Accessibility is mounted with its bottom edge at least 60 inches above the pavement.
- Verify van-accessible spaces carry the “van accessible” designation, wherever that ratio applies.
- Measure car spaces to a required minimum width, and van spaces to the appropriate wider dimensions or paired with an access aisle of equal width.
- Check that access aisles run at least 60 inches wide and sit flush against the parking space they serve, not floating in a drive aisle.
- Confirm surface slope doesn’t exceed the specified maximum ratio in any direction, since standing water and drainage grading often push lots past that limit.
- Confirm van spaces and their routes hold the required minimum vertical clearance, a detail garages with low beams or signage frequently miss.
- Check that accessible spaces sit on the shortest route to an accessible entrance and disperse across multiple entrances if the facility has them.
- Recalculate the required accessible space count and the van-accessible minimum for each parking facility on the site, not the property as a whole.
- Remember the ADA Standards don’t specify a marking color or method, so pull your municipal code before ordering paint.
Pro Tip: Keep a printed copy of your local municipal parking code in the same folder as the 2010 ADA Standards. Federal rules set the floor, but city and county codes often add requirements on color, sign material, or space counts that catch contractors off guard mid-project.
Exact Measurements for Parking Spaces, Aisles, and Signs
Getting the numbers right matters more than getting the color right, and it’s where most striping crews lose points during inspection.
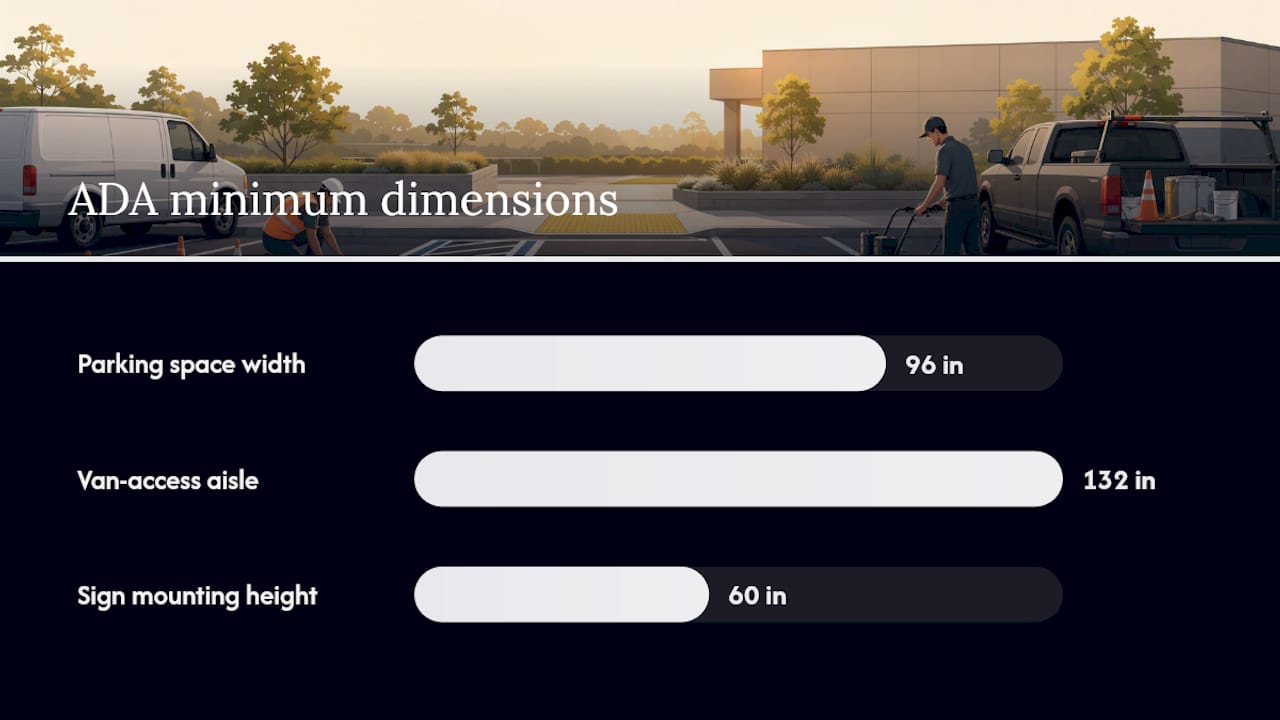
Space widths. A standard accessible car space must meet the specified minimum width. Van-accessible spaces need either a wider space on their own or a car-width space paired with an equally wide access aisle running alongside. Both configurations satisfy the 2010 Standards, so the choice usually comes down to available lot width and layout efficiency.
Access aisles. The aisle itself must be at least 60 inches wide, and it can’t overlap a vehicular travel lane. That tolerance is tighter than most contractors assume, and it’s a common failure point on lots graded for drainage rather than accessibility.
Measurement pitfall: Space and aisle widths are measured to the centerline of the painted stripe, not the outer edge, and an end space may include the paint width itself. This centerline rule trips up more restriping crews than any other single detail, according to Corey & Partners’ compliance guide. Measure twice before you cut a stencil.
Vertical clearance. Van-accessible spaces and their approach routes need to meet the applicable minimum clearance requirements. Parking garages with low structural beams, signage, or sprinkler piping need a clearance survey before any van space gets designated, not after.
Sign mounting. The identifying sign’s bottom edge must sit at least 60 inches above the ground. Signs can mount on a post, a wall, or from a ceiling in covered structures, as long as that 60-inch minimum holds and the sign stays visible from a vehicle. One exception: facilities with a very small number of total parking spaces may not be required to post an identifying sign, though most property managers install one anyway to avoid confusion.
For angled van spaces, the access aisle should be located on the passenger side, and designing for either front-in or back-in use tends to reduce misuse over time, per Access Board guidance.
How Do You Calculate Required Accessible Spaces?
The 2010 ADA Standards tie the required accessible-space count to the total number of spaces in each parking facility, not the property as a whole. A single site with three separate lots calculates each lot’s requirement independently.
- 1 to 25 total spaces requires 1 accessible space
- 26 to 50 requires 2
- 51 to 75 requires 3
- 76 to 100 requires 4
- 101 to 150 requires 5
- 151 to 200 requires 6
- 201 to 300 requires 7
- 301 to 400 requires 8
- 401 to 500 requires 9
- 501 to 1,000 requires 2% of the total
- 1,001 and above requires 20, plus 1 for every 100 spaces over 1,000
At least one in every six accessible spaces must carry the van-accessible designation, with a minimum of one van space at any facility that requires accessible parking at all.
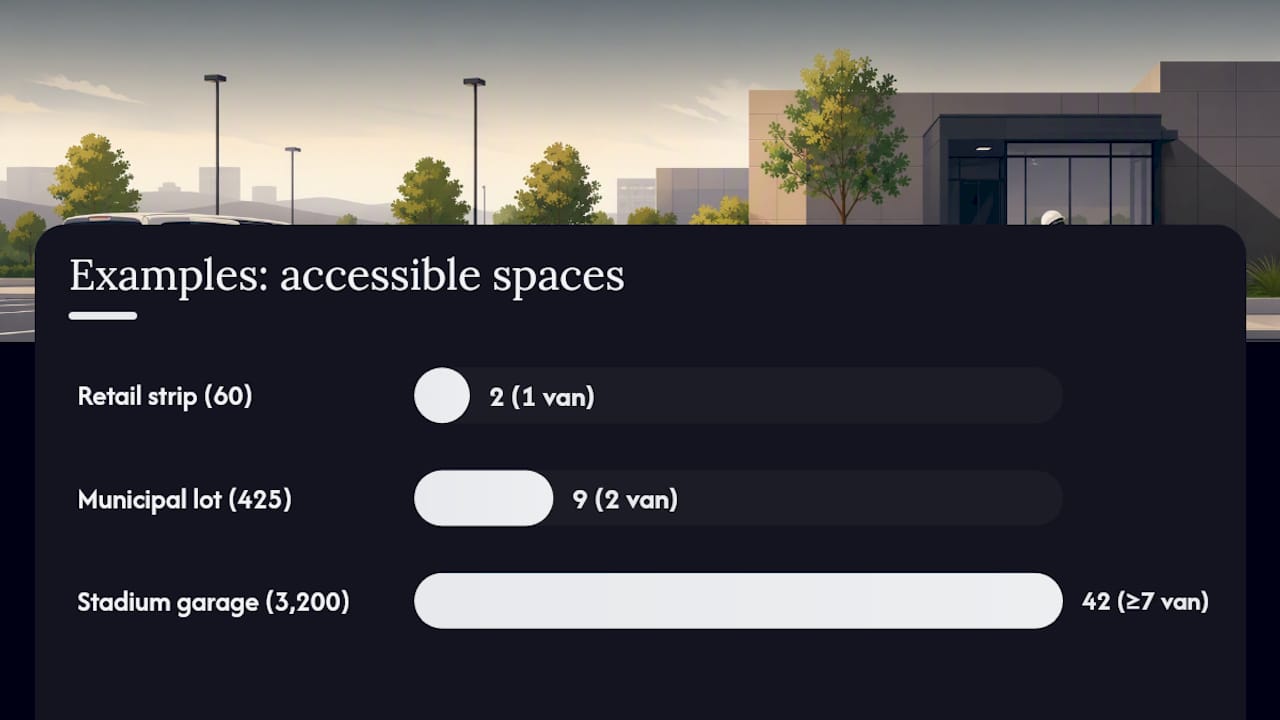
Three quick examples show how this plays out. A retail strip with 60 total spaces needs 2 accessible spaces, and since one in six rounds up to at least one, one of those two must be van-accessible. A municipal office lot with 425 spaces needs 9 accessible spaces, with 2 designated van-accessible. A stadium garage with 3,200 spaces needs 20 plus 1 for every 100 over 1,000, which works out to 42 accessible spaces, at least 7 of them van-accessible.
Marking and Painting Practices That Hold Up Over Time
The ADA leaves marking color and method to local jurisdictions, but that doesn’t mean anything goes. Most municipal codes and the Manual on Uniform Traffic Control Devices push toward high-contrast blue and white for the ISA symbol and border striping, with white or yellow hatching for access aisles. That combination reads clearly at a glance, day or night, which is the actual goal behind the requirement even where the letter of the law stays silent.
Durability starts before the first coat goes down. Surface prep, meaning cleaning contaminants, repairing cracks, and in some cases sand or abrasive blasting old coatings off concrete or asphalt, determines how long the new marking lasts far more than the paint brand does. Skipping that step is the single most common reason restriped lots fade or peel within a year.
A few practices separate markings that last from ones that need redoing every season:
- Use traffic-grade paint or thermoplastic rather than standard latex, since parking surfaces take constant abrasion from tires and weather.
- Add reflective glass beads where local code allows, which extends nighttime visibility without changing the required color.
- Mark access aisles with hatching or hash striping angled to visually discourage parking, and measure that hatching to the same centerline rule as the space itself.
- Allow full cure time before opening the lot to traffic, since rushed cure cycles are a top cause of early peeling.
- Schedule a visual inspection every six to twelve months and plan restriping before markings fade past clear legibility, not after a citation forces the issue.
Pro Tip: Budget restriping into the same cycle as your seal coating or repaving schedule. Doing both at once means one mobilization, one round of surface prep, and one disruption to tenants or the public instead of three separate projects spread across three years.
Where Should Accessible Spaces Be Located?
Placement determines whether accessible spaces actually function, and it’s the requirement most often overlooked on sites with multiple buildings or entrances.
Accessible spaces must sit on the shortest accessible route to an accessible building entrance. When a facility has more than one accessible entrance, spaces need to disperse across them proportionally rather than clustering at one door. A single ADA-compliant space beside a locked side entrance doesn’t satisfy the standard if the main entrance sits 300 feet away.
An accessible route itself has specific characteristics:
- It must be continuous, with no curbs, steps, or abrupt level changes breaking the path.
- It needs a clear width of at least 36 inches along its full length.
- Where the route includes a ramp, slope can’t exceed 1:12.
- It should stay on level ground wherever possible, since cross-slope on the route itself creates the same 1:48 tolerance problem as the parking space.
Wheel stops help here in a way that’s easy to overlook: placed correctly, they keep vehicle overhang from encroaching into the access aisle or the route, preserving the clear width inspectors measure. On lots where accessible spaces sit near a curb ramp, confirm the ramp itself meets the same route-width and slope standards, since a noncompliant ramp can invalidate an otherwise correct parking layout.
When Does Restriping Trigger ADA Compliance?
Restriping isn’t a maintenance footnote. DOJ guidance is direct on this point: when a business or government entity restripes a parking facility, that facility must come into compliance with the 2010 ADA Standards as part of the work. A faded, decades-old layout that predates current standards doesn’t get grandfathered in once new paint goes down.
A practical project sequence keeps that obligation from becoming a costly surprise mid-job:
- Survey the existing lot and count total spaces per facility to calculate the required accessible count.
- Measure current space widths, aisle widths, and slope, and flag anything short of the 96/132/60-inch minimums.
- Draft a layout plan that places accessible spaces on the shortest accessible route, dispersed across entrances.
- Complete surface prep, including crack repair and old-coating removal, before any new striping goes down.
- Specify paint or coating type and confirm it against local color and material codes.
- Mount or replace signage to the 60-inch minimum, verifying van-accessible designations match the calculated ratio.
- Document measurements, photos, and sign placement for the project file.
Pro Tip: When budget forces a phased approach, prioritize the accessible spaces, aisles, and signage first, and treat non-accessibility striping as the second phase. Inspectors and the ADA itself weigh accessibility elements as the non-negotiable core of any restriping project, even when full-lot upgrades get spread across a longer timeline.
What Southern Sandblasting & Painting Sees on Real Restriping Projects
Twenty-plus years of surface-prep and coating work across Central Florida’s municipal, commercial, and industrial sites teaches a consistent lesson: markings fail from the ground up, not the top down. A fresh coat of blue and white paint over a cracked, contaminated surface buys a property manager maybe one season before peeling starts, and then the site is out of compliance again.
Proper prep starts with removing the old coating and any oil, rubber, or grime buildup, often through abrasive or sand blasting depending on the substrate. Concrete and asphalt behave differently under coating, and choosing a primer suited to each surface, rather than defaulting to whatever’s on the truck, is what separates a marking that lasts five years from one that needs redoing in eighteen months.
A parking lot that gets restriped without addressing the substrate underneath is a lot that will need restriping again within a year or two. The paint isn’t the weak point. The surface underneath it usually is.
For municipal contracts specifically, procurement officers and inspectors want documentation: measurement diagrams, before-and-after photos, and sign-location schematics that prove the work matches the required layout. Building that paperwork into the project scope from day one, rather than reconstructing it after the fact, saves real time during city sign-off.
A few specification habits worth carrying into any municipal or commercial bid:
- Match coating type to substrate and traffic volume rather than defaulting to a standard mix.
- Confirm reflective additive specs against the local MUTCD reference before ordering material.
- Build documentation deliverables into the contract scope, not as an afterthought.
Coordinate Maintenance Cycles With ADA Upgrades
Treating restriping and repaving as separate projects wastes money. Every time a crew mobilizes for one job and skips the other, the property pays for setup, traffic control, and disruption twice instead of once. Aligning them means the accessible-space layout gets recalculated at the same moment the surface gets rebuilt, so the new pavement and the new striping match from day one instead of requiring a second pass six months later.
Keep a project file with your measurements, layout plan, and paid invoices. That paper trail is what demonstrates due diligence if a complaint or inspection ever questions whether a lot was brought into compliance in good faith, not just painted over.
— Results
Get Compliant Restriping Done Right the First Time
The part of ADA compliance that most painting crews skip is the surface underneath the stripe. Instead of just applying stripes with a stencil and sprayer, proper abrasive cleaning, crack repair, and substrate-appropriate primer are necessary so markings hold up under heat, rain, and constant tire traffic instead of fading within a single season.

That matters most on municipal and commercial projects, where a failed inspection or a faded space six months after restriping means redoing the work and the paperwork. Coordinating surface prep, coating specification, and sign mounting as a unified project, rather than as separate tasks, and documenting measurements and layouts along the way helps ensure compliance files are ready before inspection.
If you’re planning a restriping project, or a repaving job that’s about to trigger ADA obligations, get a look at our sandblasting and painting services and request a project quote before your next maintenance cycle starts.
Where to Go for the Official ADA Parking Rules
Bookmark these before your next project, not during it.
- ADA.gov’s parking page covers space counts, dimensions, and signage rules in plain language, and it’s the fastest reference for a quick compliance check.
- The Access Board’s Chapter 5 guide explains the reasoning behind each technical requirement, useful when a contractor or inspector disagrees on interpretation.
- The 2010 ADA Standards PDF is the actual governing document. Keep a copy on-site during any restriping or new-construction project.
- The DOJ restriping guidance spells out exactly when restriping legally triggers full compliance, which is the single most misunderstood rule in this entire process.
Sources
- Ada
- Guide to the ADA Accessibility Standards — Chapter 5: Parking Spaces — U.S. Access Board
- 2010 ADA Standards for Accessible Design (PDF)


